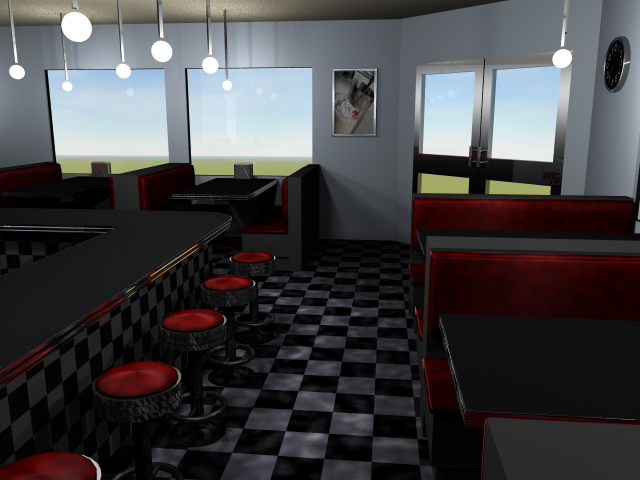
The Diner Scene was rendered for the 2007 UCSD Rendering Competition, where it earned “Honorable Mention”.
Final Images
[Not a valid template]Stats
| Triangles | 78,993 |
| Point Lights | 0 |
| Area Lights | 0 |
| Sphere Lights | 11 |
| Render Time | 5hr 24min |
Diner Components
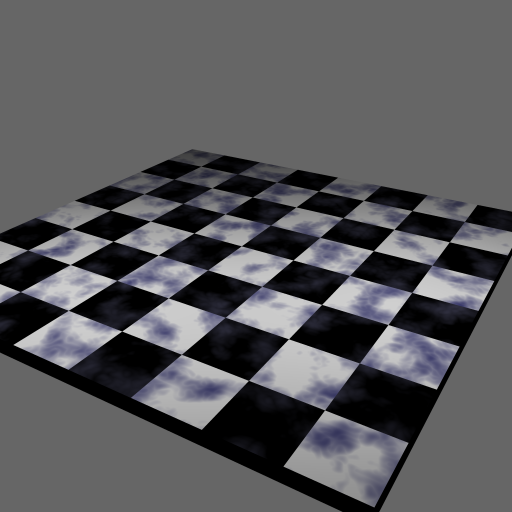
Floor:
The floor is a complex aggregation of textures combined with the features in the texture system. I have two separate marble concoctions that make up the separate black and white checks in the checkerboard. The white marble is composed of three layers of marble shaders, modulated by a noise texture. The black marble is only one marble layer.
In order to create the checkerboard effect I use my procedural checker texture to serve as the reference lookup as to which of the two marble textures to use. So, in fact, the checkerboard pattern shown is actually not created via the colors from a CheckerTexture; instead it is the result of a checker pattern filter of letting in either one marble or the other.
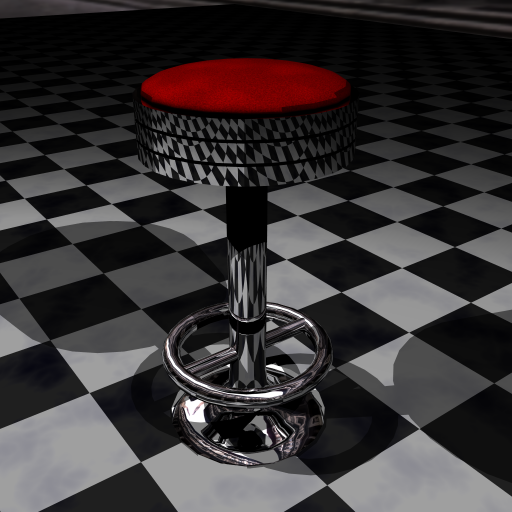
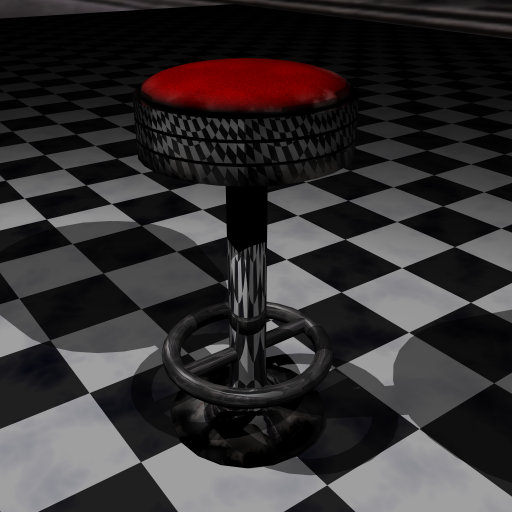
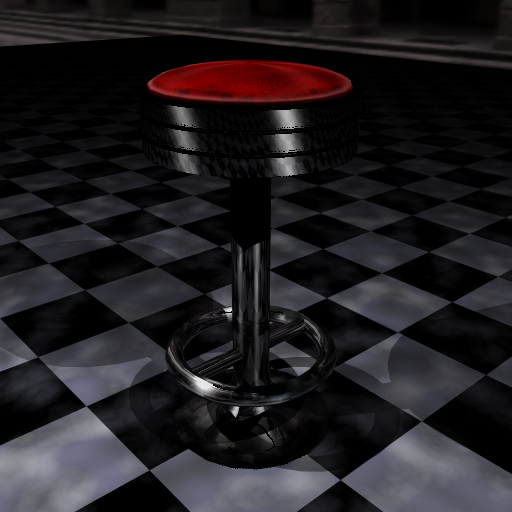
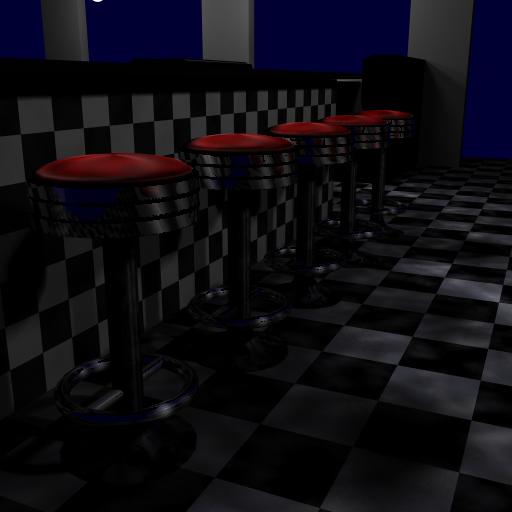
Barstool:
The barstool was the first thing that came to mind when I started working on this scene, and, interstingly enough, it was the most difficult object within the scene in terms of modeling and shading.
The barstool model is composed of four separate meshes: shaft, footrest, seat, and cushion. Each of these required different shaders to get the final end result I wanted.
To start, the shaft is reflective, but I wanted to add some grime to the base where one would expect shoes and other things to scuff it up and prevent reflection. Therefore, I used my gradient texture as a filter for a “tarnish” shader built from layers of marble and noise textures. This same technique was applied to the footrest and the seat with different elevation parameters to adjust the interpolation slope of the gradient. In addition to the reflective contribution of the material, I mixed in an anisotropic component which allowed for a more metallic blooming effect in some areas.
The diffuse input to the barstool cushion material is created from a pair of noise textures. Though it is not very apparent from the final renderings, I went to great detail in attempting to get a nice balance of the spots in hopes to mimic some of the barstool/booth cushions I have seen in my own experience. Again, in an effort to add some wear and tear, the barstool cushion has a gradient texture filter for a marble texture to give some more dark spots around the edges. Finally, the key to what I personally believe makes this scene amazing is the anisotropic material that is applied to the cushion, which is exploited as well as helps define the spherical shape of the cushion’s geometry.
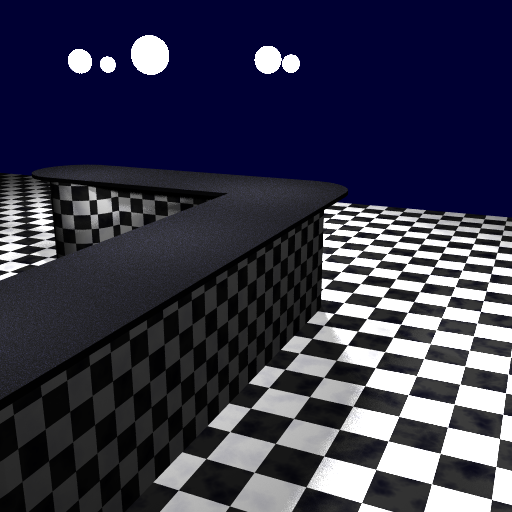
Bar:
The bar is a pretty complex piece of geometry. It is L-shaped and is rounded on both ends. It has a similarly shaped counter top which also has a metal rim outline.
I’m not sure why I made the bar base shaded with a checkerboard pattern. I was using it as a test material while I was adding a secondary gradient layer for some more grime and never changed it because I think it looks better than if it had been a solid color, especially since it is heavily in shadow (I project that such a decision may be changed if I had path traced my image).
The bar counter top is made from a combination of noise textures. The detail is a bit fine-grained like the barstool cushions but you should be able to see it in any up-close renders I have included here.
The counter top rim is a purely reflective mirror material. I decided to add grooves to the rim (in accordance to many of the reference images I have) to help break up the reflections. This is a nice detail that can be observed in the final image, where some of the grooves are reflecting the red from the barstool cushions while the others are reflecting the sky blue background color through the windows.

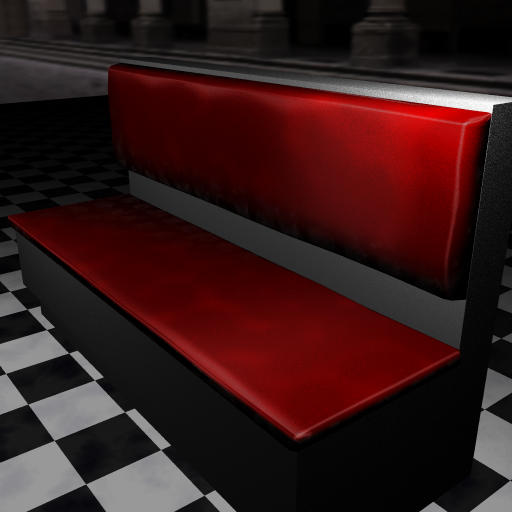
Booth:
The booths went through several iterations, mainly because I had a hard time deciding what style I wanted them to be in step with. I had originally had them with more smoothed edges and a more “puffy” seat cushion but, to me, it didn’t look right so I ended up scrapping it all and started modelling from my own imagination. Overall I’m happy with the end result even though my booths don’t look like any of my reference photos.
In fact, there’s nothing really amazing about the booth seats aside from the cushions. I added some displacement in the geometry (read: slightly adjusted some vertices so that the top of the cushion was not flat) to give it a used feel, but it turned out that after I added the materials and lighting that this finer detail can’t really be observed.
The booth cushions are shaded with a shader similar to those on the barstool so I won’t detail the process here. However, I do want to point out how the anisotropic reflection nicely outlines the edges of the cushions.
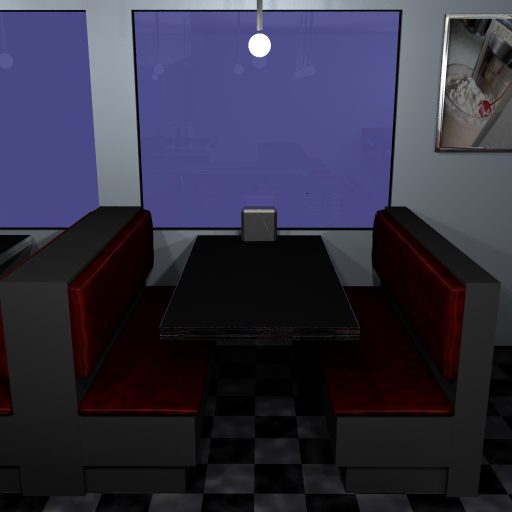
There are five booths in the scene: three on the side and two in front. Each booth has a table and napkin dispenser. The table is composed of two parts: the table top and the rim. The table top uses the same material as the bar counter top (see above) and the rim is a purely reflective mirror (also like the bar counter top).
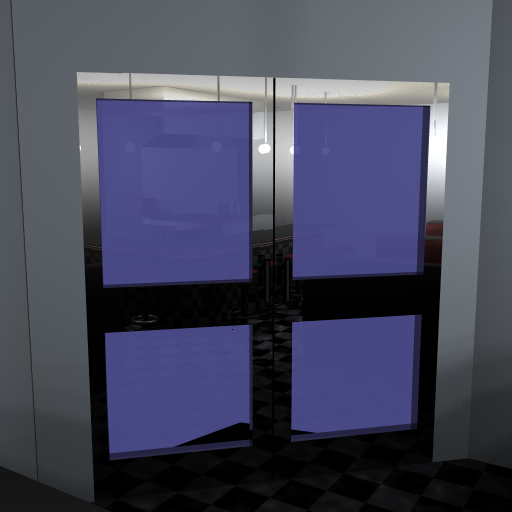
Door:
I hadn’t really thought of putting a door into my scene until I remembered the scene in Back to the Future when Marty meets his dad in the diner. After rewatching the scene a few times I decided to try to mimic the basic layout of the diner as well as the addition of the angled doorway.
The door is composed a three pieces: doors, handles, and the glass. I thought to myself that with the door being at an angle I could set up my shot in such a way that the viewer could see a whole lot more of the diner than what was in the camera’s line of sight. This was one of my main reasons for making the door reflective as well as why most of the door is made of glass.
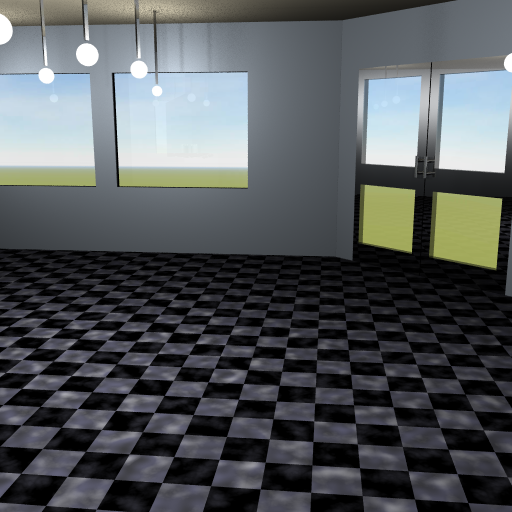
Structure and Layout:
I ended up spending a lot of time playing with the structure and composition of the scene. I think I had a lot of ideas in my head when I first started the project, but nothing converged on a single shot or component I wanted to focus on within the diner.
I also suppose this would be a good place to talk about the background color. I had originally wanted to use some sort of skybox or billboards to be outside the window. However, there ended up being a couple problems with this addition: the first is that I was never satisfied with the results — nothing fit the scene correctly or was suitable to be a simple background; the second was that I wanted to be able to see the reflections on the window glass from everything inside. I had originally wanted to use a darker color to emphasize these, but I ended up deciding that it was better left as a subtle detail of refinement rather than trying to make it be something heavier.
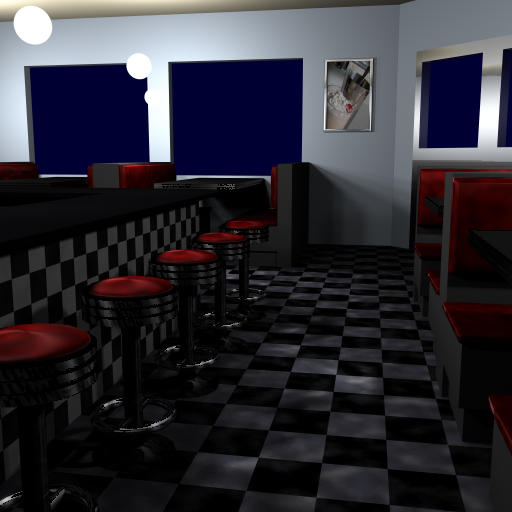
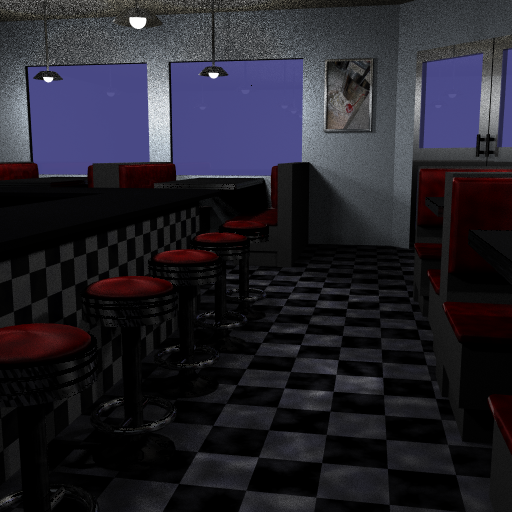
I’ve included some early images to show the progression.
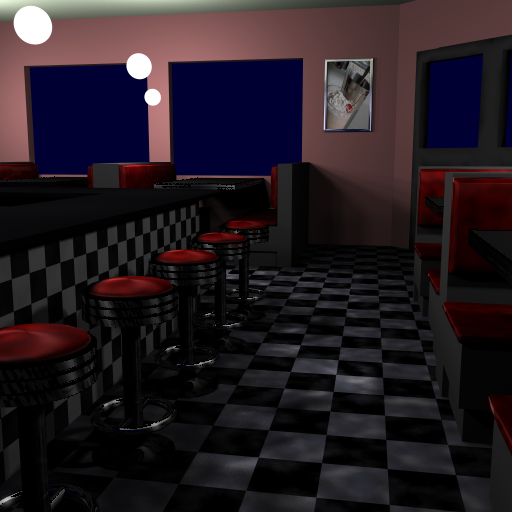
Lighting:
Let me state up-front that the lighting to the scene is not what I had intended for it to be. I had originally modeled some coned light fixtures to provide a more realistic lighting scheme and direct the light in a more “spotlight” manner; however, since I did not end up using path tracing or photon mapping to fully illuminate the scene this caused much of the ceiling to be black. This was unacceptable and so I ended up having to remove the cones from the fixtures.
All the lights in the scene are sphere lights. This allows for some nice soft shadowing effects along the back wall, through the barstool footrests, and on the booths.
Napkin Dispenser:
One of the decorations I populated the scene with was the napkin dispensers for each table. They are a relatively simple yet important addition to the composition of the scene. The napkin dispenser uses the Isotropic Ward shading material.
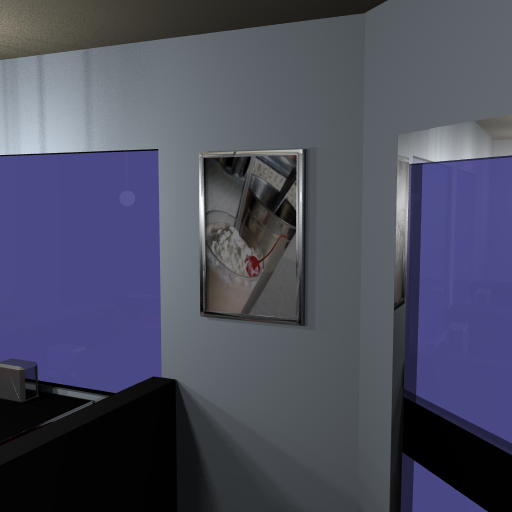
Malt Picture:
Next to the barstool cushions, the thing that really makes this scene for me is the picture of the malt on the back wall next to the door. It is one of the two image textures used the scene and is something I found while searching for reference photos online. Simply put, when I came across this image I knew that I needed to have it as a picture hanging up in the scene.
The picture frame material is the same reflection / anisotropic combination I have been using throughout the rest of the scene; however, I adjusted the parameters more in favor to the Anisotropic Ward shader to obtain the brushed metal look.
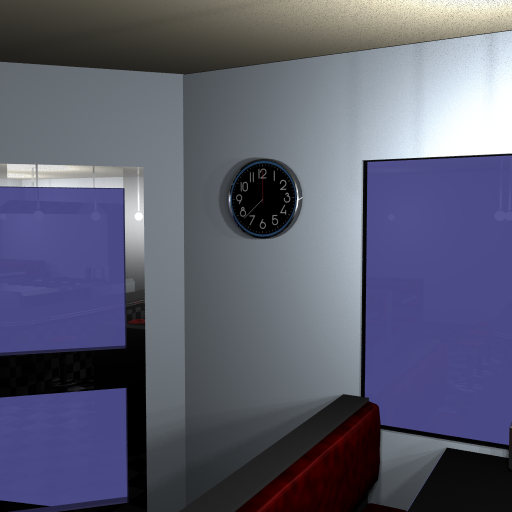
Clock:
After I added the malt picture, the small wall on the other side of the door was looking a little empty so I played with the idea of having another picture but it didn’t quite suit my fancy — I wanted the malt image to be special… after all I thought is was a nice addition to the scene and its uniqueness as the only picture in the scene helps support that, even to the point that your eyes are almost immediately drawn to it (sort of because our eyes have been trained to do that). The idea I came up with that helped balance the scene was a clock.
The clock face is the only other image texture used in the scene and the clock rim is the exact same material used for the malt picture frame.
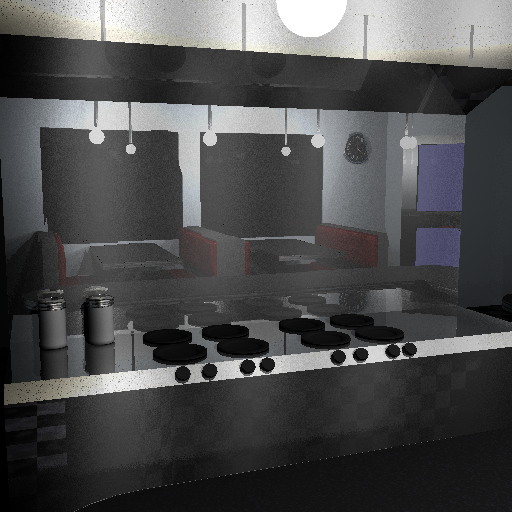
Kitchen:
Although it can’t be directly seen, I modeled a modest kitchen setting for the diner. This was the final geometric addition to my scene and I added it because when looking at the reflections in the windows I wanted to see something more than just empty nothingness behind the bar. It includes a stove top, complete with burners and nobs, and a couple of containers.
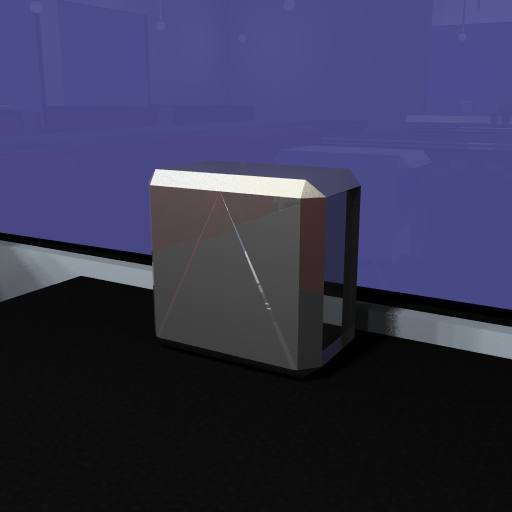
Skybox:
The final addition to my scene was the skybox. This component was not added until after the final competition.